Kubernetes ft. Spring Boot (Series) - Deploying to Minikube #2

Letting go is never easy, manage your applications beyond localhost!Brief
In the previous post we created the Spring applications, tested that they run locally and that they connect to each other. In this one, we'll deploy them to a Kubernetes cluster and we'll test them in the new environment.
We'll use Minikube to create the Kubernetes environment. Minikube is a tool that lets you run Kubernetes locally. It runs a single-node Kubernetes cluster on your local machine and can be ran on Windows/macOS/Linux.
More details on minikube and installation steps can be found on the Kubernetes documentation page.
For this series, I'll assume you are familiar with Kubernetes concepts and ways of working. Maybe I'll create a Kubernetes 101 series too.
Implementation
Dockerizing the applications
First, we need to set the Docker environment variables so we use the same Docker daemon as minikube, because in our case, we'll use the local Docker registry as the container images hub. And we do it by running:
eval $(minikube docker-env)
In a production setup, the Docker images will be pushed to the Docker hub so they are accessible regardless to the location where the Kubernetes cluster is ran.
Second, we'll create a Dockerfile for each application in order to add our jars to the Docker registry. A Dockerfile is a simple text file that contains a list of commands that the Docker client calls when creating an image.
Dockerfile commands:
FROM – specify base image
COPY - copy files to the container
ENTRYPOINT – the command to be run when the container starts
For our two applications, the Dockerfiles will look like this:
FROM adoptopenjdk/openjdk11:alpine-jre
COPY /build/libs/app-caller-0.0.1-SNAPSHOT.jar app-caller-0.0.1-SNAPSHOT.jar
ENTRYPOINT ["java","-jar","app-caller-0.0.1-SNAPSHOT.jar"]FROM adoptopenjdk/openjdk11:alpine-jre
COPY /build/libs/app-receiver-0.0.1-SNAPSHOT.jar app-receiver-0.0.1-SNAPSHOT.jar
ENTRYPOINT ["java","-jar","app-receiver-0.0.1-SNAPSHOT.jar"]After creating these files, let's build the Docker images. We'll go to each directory and run the following command:
docker build . -t {image-name}:{image-version}
Example:
docker build . -t app-caller:0.0.1
Deploying to minikube
First, let's start the Kubernetes cluster:
minikube start
Actually, the command we'll need to run is minikube start --driver=virtualbox. I'll explain why when we get there.Second, we'll deploy the applications using K8s deployment files.
apiVersion: apps/v1
kind: Deployment
metadata:
  creationTimestamp: null
  labels:
    app: app-caller-dep
  name: app-caller-dep
spec:
  replicas: 3        // we'll deploy three different instances
  selector:
    matchLabels:
      app: app-caller-dep
  strategy: {}
  template:
    metadata:
      labels:
        app: app-caller-dep
    spec:
     containers:
     - image:app-caller:0.0.1       // the image built based on the Dockerfile
       imagePullPolicy: Never       // needed so we use the image in the local registry and not going to the Docker hub
name: app-callerkubectl apply -f app-caller-dep.yaml
apiVersion: apps/v1
kind: Deployment
metadata:
  creationTimestamp: null
  labels:
    app: app-receiver-dep
  name: app-receiver-dep
spec:
  replicas: 3
  selector:
    matchLabels:
      app: app-receiver-dep
  strategy: {}
  template:
    metadata:
      labels:
        app: app-receiver-dep
    spec:
      containers:
      - image: app-receiver:0.0.1
        imagePullPolicy: Never
name: app-receiverkubectl apply -f app-receiver-dep.yaml
At this moment we have the two applications running inside the Kubernetes cluster. But if you are familiar with how connectivity inside a K8s environment works, you know that the applications cannot yet communicate with one another.
-
Communication between
app-callerandapp-receiver-
We'll create a ClusterIP service to expose the
app-receiverapplication only to other pods inside the cluster and not to outside traffic. As you remember, this application should only be reached from theapp-callerapplication.
kubectl expose deployment app-receiver --port=9992 --target-port=9992 -
We'll update the
app-callerdeployment to override itsapplication.propertiesso, when trying to reach theapp-receiverinstead of sending requests tohttp://localhost:9992we'll use the newly created service:http://app-receiver-dep:9992. The following lines need to be added to theapp-caller-dep.yamlfile:env: - name: receiver.host value: http://app-receiver-dep - name: "receiver.port" value: "9992"
kubectl apply -f 'app-caller-dep.yaml // to update the deployment -
-
Communication between
clientandapp-caller-
We'll create a NodePort service to expose the
app-callerpods to outside traffic.apiVersion: v1 kind: Service metadata: name: app-caller-svc spec: type: NodePort selector: app: app-caller-dep ports: - name: http protocol: TCP targetPort: 9991 nodePort: 30000 -
Next, we need to get the local cluster's ip with:
minikube ipthat will return a value, let's say:192.168.64.6 -
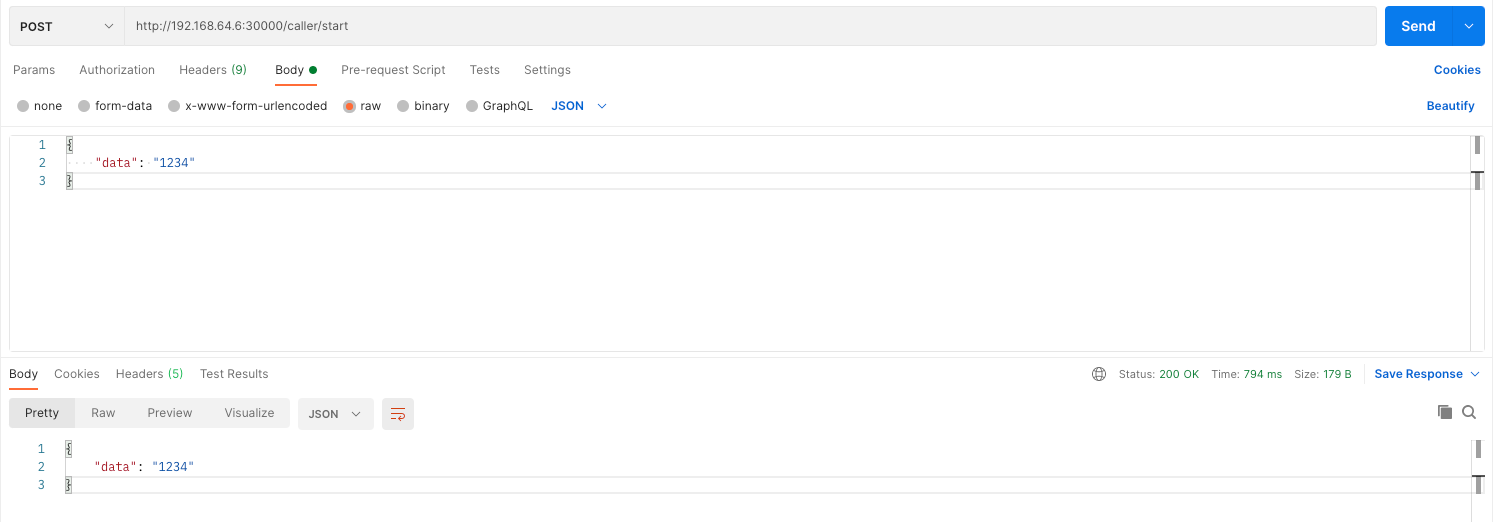
Then, we can access the application through a request to:
http://192.168.64.6:30000/caller
-
Test
We can now simulate being a client through a Postman request:
To be continued
In the next post we'll add Istio into the picture to find a way to have an overview of the cluster and a whole lot more. See you there!
Stay tuned! 🚀